GRADES
9-12; Undergrad; Grad
DURATION
90+ minutes
SUBJECTS
Biology, Ecology, Environmental Science, Marine Science, 3D Modeling, Computer Science, Photography
STUDENT LEARNING OBJECTIVES
- Develop an understanding of photogrammetry and 3D modeling’s uses in biology, ecology and other scientific fields
- Learn to build a basic 3D model
- Gain insight into photogrammetry methods used by professional scientists
KEY POINTS
- Photogrammetry and 3D modeling are powerful tools used by scientists, artists and engineers in many disciplines.
- 3D models are simple to construct and can be used by scientists of all levels, including high school students.
- Photogrammetry and 3D modeling have unique strengths and limitations.
KEY QUESTIONS
- Why do field scientists choose to create 3D models of their subjects? What are the benefits that models provide?
- How does data generated from photogrammetry and 3D models compare to data gathered with other experimental methods?
- How do 3D models compare to photographs, videos and written articles as tools for science communication?
NEXT GENERATION SCIENCE STANDARDS
HS-ETS1-3: Evaluate a solution to a complex real-world problem based on prioritized criteria and trade-offs that account for a range of constraints, including cost, safety, reliability, and aesthetics as well as possible social, cultural, and environmental impacts.
NEXT GENERATION SUNSHINE STATE STANDARDS
SC.912.N.3.5: Describe the function of models in science, and identify the wide range of models used in science
SC.912.CS-CC.1.5: Represent and understand natural phenomena using modeling and simulation
OCEAN LITERACY PRINCIPLES
Principle #4: The ocean supports a great diversity of life and ecosystems
Principle #6: The ocean and humans are inextricably linked
UN SUSTAINABLE DEVELOPMENT GOALS
![UN Sustainable Development Goal 4 [Quality Education] logo](https://angari.org/wp-content/uploads/2021/06/E-WEB-Goal-04-250x250.png)


BACKGROUND
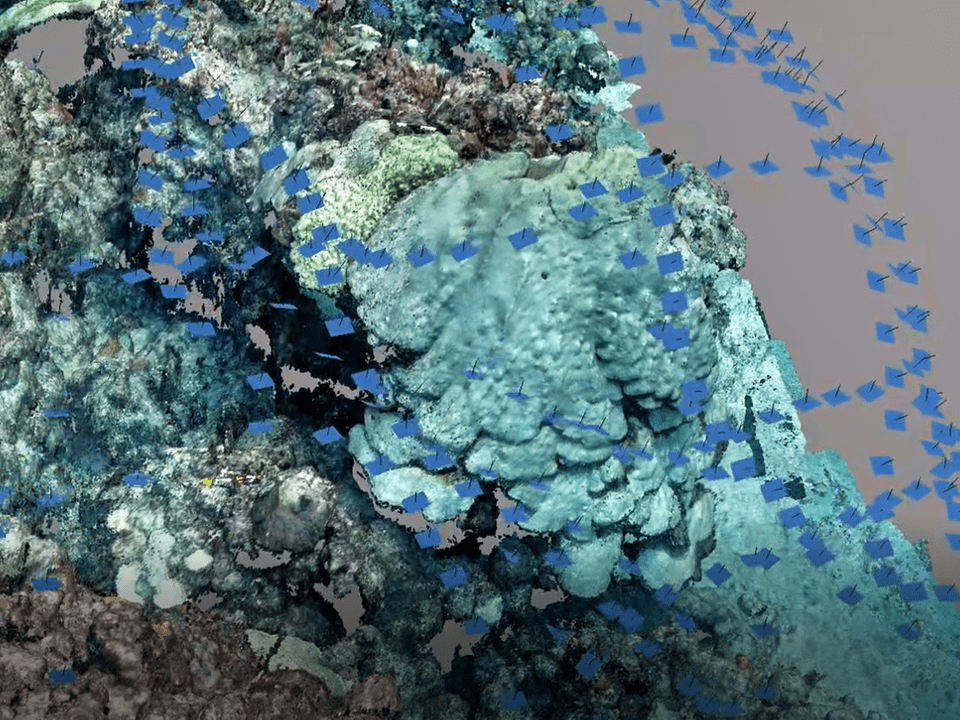
Photogrammetry, or the practice of constructing three-dimensional (3D) models from still images, has become a popular tool among scientists, engineers and artists in the past few decades, and its applications continue to increase. Natural scientists, including biologists and paleontologists, use photogrammetry to bring their subjects to life with interactive models that can be 3D printed or explored with computers or augmented reality. These models capture our imaginations by revealing hidden features of an organism’s physiology that may be impossible to view otherwise. Likewise, archeologists use photogrammetry to preserve precious artifacts, and create exquisitely detailed replicas. Artists and video game developers use photogrammetry to create immersive digital worlds, while engineers may use photogrammetry to map an entire city!
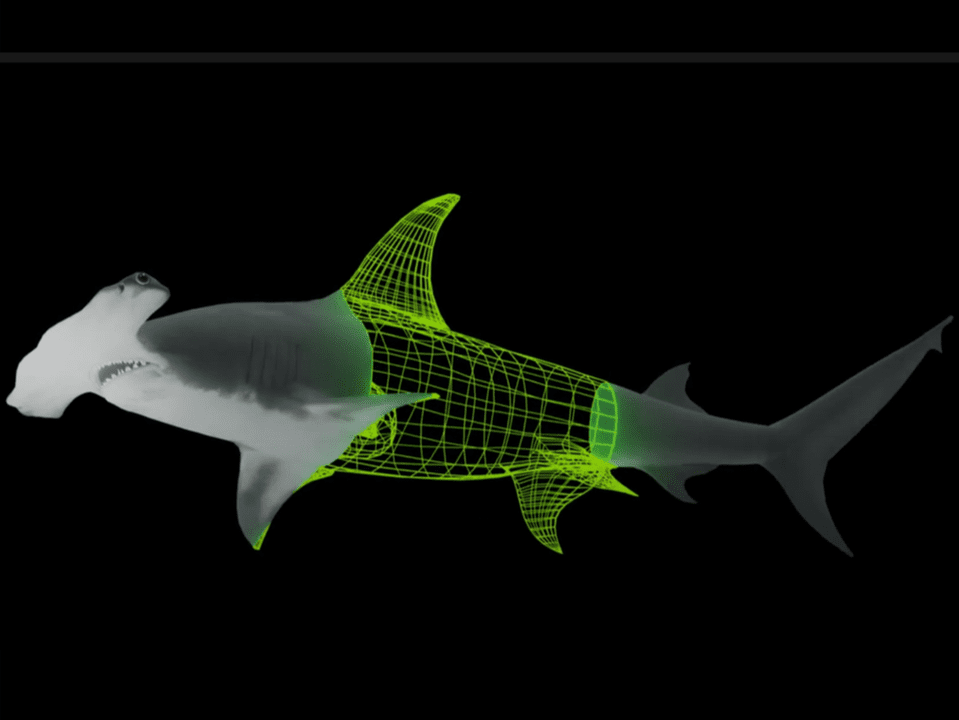
The scientists and field researchers we work with at ANGARI Foundation use photogrammetry to study and document marine life, and to share their work with the public. Photogrammetry allows them to collect data from wild organisms that is usually very difficult to measure, and create engaging models that tell unique scientific stories. Our research collaborators have modeled coral reefs, great hammerhead sharks, mangrove habitats, green sea turtles and more using the same techniques that we introduce in this lab.
In this activity, students will explore real life examples of scientists working with photogrammetry and 3D modeling for data collection, and create their own interactive 3D model using basic photogrammetry procedures. Here, photogrammetry is presented as a research tool, which students will compare to traditional lab methods, but we also hope to spark students’ imaginations and introduce them to photogrammetry’s wide range of applications. Students can use the methods outlined in this lab in any number of fields- from biology, to history, computer science, or digital art projects. The possibilities are limitless!
MATERIALS
- Object that fits within an approximately 5” by 5” by 5” cube (e.g. shell, coral skeleton fragment, mineral, etc.)
- White background (e.g. piece of paper, table, etc.)
- Ruler
REQUIRED EQUIPMENT & TECHNOLOGY
- Handheld camera (e.g. mobile phone)
- Personal computer
- Internet access
- Open-source close range photogrammetry software (e.g. Regard3D for Mac, Meshroom for PC/Linux)
- Open-source mesh editing software (e.g. MeshMixer)
VOCABULARY
Photogrammetry – The practice of combining photographs, to create maps, drawings, complex measurements or 3D models of real-world objects or scenes.
Mesh – A collection of vertices, edges and faces that describe the face of a 3D object. It can be thought of as a very detailed polygon with many different features.
3D Model – A three-dimensional representation of a physical object or concept.
Field Research – The collection of raw data in the natural world, outside of a traditional library, laboratory or workplace setting.
PRE-LABORATORY SETUP
- Have students watch one or more short videos describing how 3D models are created and used by natural scientists, and explore related 3D models.
– Will Greene Scientist Spotlight video and 3D coral reef models from The Bahamas
– The Making of Nemesis video and great hammerhead shark 3D model
– The Making of Skye video and giant manta ray swimming / feeding 3D models
– Generation Ocean: Coral Reefs 360 film and coral reef and engineering applications of 3D modeling
You may also wish to have students read and discuss (e.g. think-pair-share, Socratic seminar) the following peer-reviewed journal article: Irschick, D. J., Christiansen, F., Hammerschlag, N., Martin, J., Madsen, P., Wyneken, J., … & Lauder, G. (2022). 3D visualization processes for recreating and studying organismal form. Iscience, 104867. DOI: https://doi.org/10.1016/j.isci.2022.104867 - Ask students to bring in an object for their model. Objects such as shells, rocks, coral skeleton or unpolished wood tend to work well. For best results, the object should meet these criteria:
– Opaque (not glass or transparent)
– Matte (without any shiny or reflective sections)
– Patterned with distinctive markings (not a solid color)
– Waterproof (for volume measurement with displacement) - Before class, ask students to download these free photogrammetry programs onto their computers. If possible, pre-load them onto student’s computers.
– MeshRoom (PC or Linux)
– Regard3D (Mac)
– MeshMixer (PC, Linux or Mac)
LABORATORY EXERCISE
This exercise may be completed in the classroom or remotely by an individual. If preferred and classroom circumstances allow, students may work in pairs or small teams.
Collecting the Photos/Data for the 3D Model
- Have students position their object on a surface they can easily walk around, like a stool or desk. If possible, cover the surface with white paper if a dark object, or black paper if a light object to provide a neutral high-contrast background.
- Have students orient their camera at a 45-degree angle to the object. Once the angle is set, have them move the camera closer until the object fills their viewfinder/screen.
- Keeping their cameras pointed at theirs object from the same angle, have students slowly walk around their objects in a circle, taking a photo with each step. Each new photo should be between 50% and 75% similar to the previous photo.
- Continue until they have circled their objects completely, and have captured ~30 photos.
- Once the first circle is completed, have students lower their camera until they are at eye level with their objects, and circle the objects again, taking a new photo with each step.
- Have students take a few last close-up photos of their objects. This will help the software fill in the object’s textures and details.
- Have students import/save their photos to a folder on their computers.
- Instruct students to quickly look through their photos and remove any that are blurry or out of focus. They will need 60 – 80 usable photos to proceed.
Building the 3D Model [via PC or Mac]
On a PC:
- Open Meshroom
- Drag and drop the images from their folder into the “Images” section on the left side of the Meshroom window.
- Press the green “start” button at the top of the screen to begin creating the model. This will take a few minutes. On the right portion of your screen, Meshroom will begin creating the 3D point density as it processes the images.
- Once Meshroom has finished its operations, a full 3D model of the object will appear in the far-right portion of the screen.
- Save and export as a “.ply” file.
On a Mac:
- Open Regard3D
- Select File, “New Project”
- Select “Add Picture Set”
- Select the photoset from the saved folder of images.
- Regard3D will open a new window with camera specifications for each photo in your photoset. For iPhone cameras, left click on the “sensor width” tab, select “set sensor width” and enter “6.17” mm.
- In the lower left quadrant of your screen, press “Compute matches”. Set the keypoint sensitivity (the top slider) to “Minimal”, on the far left, and press “compute matches”.
- During this step, Regard3D is identifying similarities and differences between the photos, called matches. This step may take time, as Regard3D is identifying thousands of matches between each photo.
- Once the software has finished computing matches, press “Triangulation” in the lower left quadrant of the screen.
- Select “stellar initialization” and press “Okay”.
- During this step, Regard3D is generating 3D points in space based on the matches it computed in the previous step. When the triangulation is finished, a handful of points will appear spread around the blue trackball in the center of the screen.
- Now that the triangulation is done, press “create dense point cloud” in the bottom left quadrant of the screen, and press “Okay” in the prompt window.
- During this step, Regard3D fills in the gaps between the points generated in the triangulation step, and creates a dense point cloud that closely resembles your object.
- You’re almost there! A 3D cloud of points should appear around the trackball in the shape of your object.
- In the lower left quadrant, press “create surface”, and press “Okay” in the next window.
- Wait several minutes. Once Regard3D has finished the surface, a smooth, 3D mesh of your object without holes will be generated.
- Press “export”, select “.obj” as the file type.
Collecting Data from the 3D Model
- Open the .obj generated in Regard 3D or Meshroom in MeshMixer
- Before calculations can be made, the extra surfaces in the model will need to be cleaned up, such as floating areas of mesh or sections of the table that are not part of the object. To clean these areas, use the select tool to draw an area around the excess areas and press X. Keep selecting and deleting until only the object remains.
- Right now, the model is just a surface, not a complete solid, with a hole in the bottom where the object rested on the table. In order to measure volume and surface area, this needs to be filled in.
- On the side bar in Meshmixer, select “Edit” on the side bar and click “Make Solid”. This closes the surface into a “watertight” mesh, with no holes.
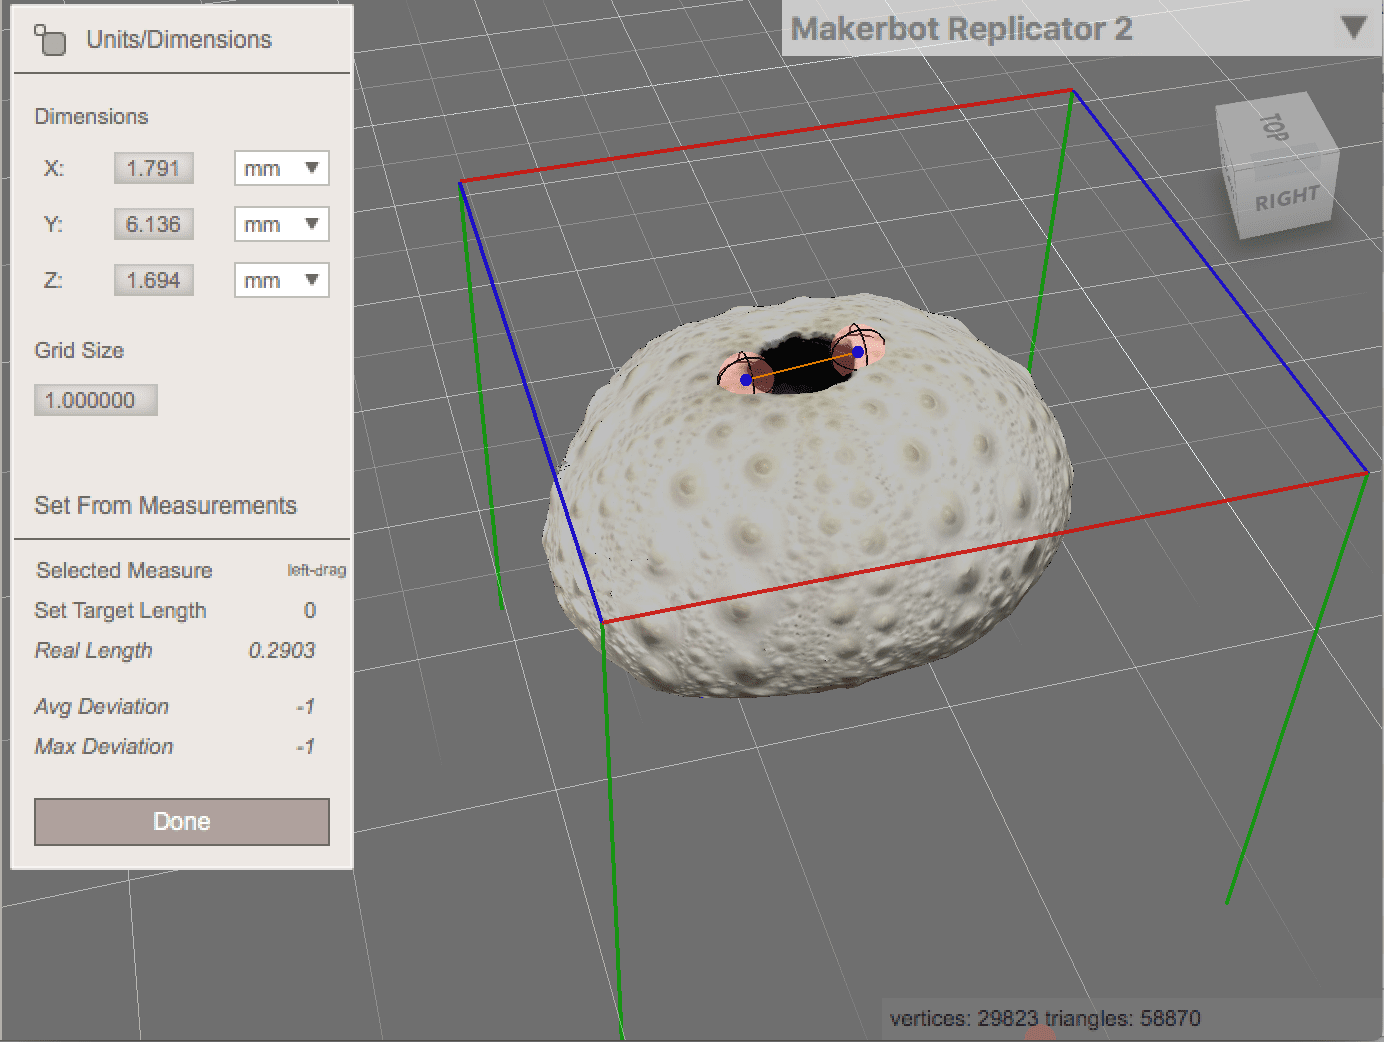
- Now that the object is solid, set a scale in MeshMixer to calculate surface area and volume.
- On the sidebar, click on “Analysis” and select “Units Dimensions”
- Using a ruler, measure the physical object’s (not the model’s) length, width or height in centimeters.
- In MeshMixer, draw a line across the model in the same place the measurement was made with the ruler.
- Enter the measurement into the “target length” field and press “Done”
- Now that the scale has been set, MeshMixer’s measurements will match the length and width of the physical object.
- To calculate surface area and volume, click on “Analysis” again and select “Stability”. Record the surface area and volume of the object.
- To calculate the object’s actual volume, fill a large beaker with water and record the initial volume.
- Place the object in the water, and record the new volume.
- Subtract the initial volume from your new volume to calculate the object’s volume.
- To calculate your object’s surface area, model it as a simple cylinder. Record your object’s height and estimated radius, and calculate surface area using the equation area = 2πr2 + 2πrh.
- Have students refer to their worksheet for closing analysis and discussion questions.
CLOSING QUESTIONS/PROMPTS
How did the surface area and volume values you calculated for your 3D model in MeshMixer compare to the values you calculated using measurements in the lab? Which do you think are more accurate? Why?
Now that you’ve created your own model, why do you think photogrammetry is such a popular tool with scientists and engineers? How do you think it contributes to their work, and helps them share their results with the public?